How to engage?
-
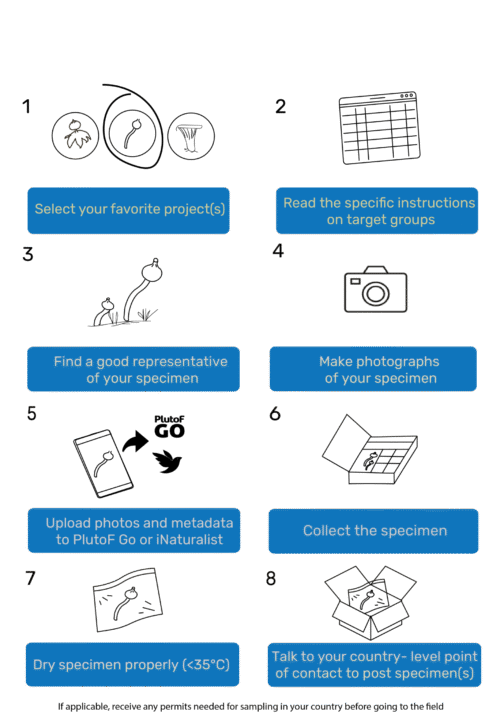
1) Select project
Select the project you would like to join from the Current Projects.
-
2) Read instruction
On the webpage of each project, you will find several instructive materials (e.g. booklets, leaflets, additional explanations, and links to scientific papers). Read these materials carefully as they will allow you to prepare best for the field sampling. It is also in there where you can learn whether we ask you to sample for specimens or observations are enough.
-
3) Find your target fungus
When you know what you are looking for, it is time to go to the field and record your findings. In our instructive materials, you will find some indications on where to look for specific targets.
-
4) Make informative photos
Photographs are crucial for confirmation of morphological identification. However, while photographing a mushroom for identification, it is not necessarily the most important thing to make the photo as beautiful as possible. The most important thing is to make it as informative as possible. Remember to photograph the specimen from multiple angles, while it is growing in the substrate, but also after you gently unearth one. If possible, take a photo of more than one fruiting body. Finally, get a picture of the surrounding habitat. More than one photo is better!
-
5) Register your record in biodiversity recording app
There are several biodiversity recording apps you can use to register your findings. This includes observations, specimens, and material samples. In FunDive project we use PlutoF GO and iNaturalist. To be able to start recording your specimens for FunDive you will need to: 1) download app, 2) create your user account, 3) adjust your settings.
* Participants from Denmark are encouraged to use the Danish Fungal Atlas app.
* Participants from The Netherlands are encouraged to use VERA app connected to verspreidingsatlas.nl. Instructions in Dutch can be downloaded via this page: https://www.mycologen.nl/onderzoek/systematiek-taxonomie/fundive/
* Participants from Finland are encouraged to use https://laji.fi/.
* Participants from Switzerland are encouraged to use the smartphone app FlorApp (in combination with the InfoFlora Fieldbook).In order to register in PlutoF GO app: Follow the step-by-step Joining guide! or watch instructive video.
*For step-by-step joining guide in Greek [download pdf]To register a specimen in the PlutoF database you would need to fill the “specimen registration” form using the PlutoF Go app. To do that, you would need to take photos of the specimen and the surrounding habitat. With the app’s help, you will set the location, the date, and the identification of your finding, and add any additional remarks and metadata. You will also need to create a unique ID number for each specimen that you will use later to track the collected specimen. In the end, do not forget to upload your registered record to the project database.
Follow the step-by-step Specimen registration guide!
* Remember, don’t collect specimens in private and protected areas, or if you find a protected species! In these cases, you only need to record observations of the encountered species in PlutofGo. In this case, click the “Add observation” button in the app instead of the “Add specimen” and fill the form in a similar manner like in the Specimen registration guide.
-
6) Collect and dry your specimen (if needed for specific project)
While collecting fungal specimens for further identification or to deposit them in fungaria it is important to try to bring them home as undisturbed as possible. When going mushroom hunting remember to take a basket with you, a grid plastic box, and waxed paper bags. Remember about a pen and paper to note the ID number of collected specimens, and a phone to make a record in PlutofGo app. After coming home remember to add remarks of your specimens, and to dry them properly. Dried, separately packed specimens with clearly written ID numbers are ready for barcoding!
-
7) Send your specimen for barcoding
If your collected specimen is prepared for transfer, registered in PlutoF, and visible in the FunDive records, it is ready for barcoding! To get your specimen sequenced, get in touch with your country-level point of contact to receive shipment instructions. In case of any questions feel free to contact your country representatives. Remember that the better metadata provided for collected specimens, the bigger the chance they will be included in the DNA barcoding.
-
8) Track your record
After you upload a record of any collected specimen in PlutofGo, it will appear in the FunDive records (records from iNaturalist will be transferred to central Plutof database). You will find your record based on the specimen ID in the table on the website. You can arrange the records the way you prefer: alphabetically or by the record date. By checking the Status column in the table, you will know: if the DNA of your specimen was isolated (DNA), if the adequate barcode was amplified (PCR) and if the barcode was sequenced (Sequenced). Identification of your specimen will be visible in the Taxon column. Please note that we can update your suggested identification. You can also see, modify, and follow your specimen record in PlutoF Workbench.
Visit PlutoF video tutorials to learn more.
Please contact the country-level point of contact for further information.